Buscar
-

RCP que salva vidas: ¿Están sus habilidades actualizadas?
If CPR (cardiopulmonary resuscitation) is performed in the first few minutes of cardiac arrest, a person’s chance of survival can double or even triple. Troy Wiedenbeck, MD, cardiologist with the Renown Institute for Heart & Vascular Health, explains how you can be ready to perform it in case of an emergency. According to the American Heart Association, over 350,000 out-of-hospital cardiac arrests occur in the U.S. This highlights the importance of CPR to everyone, not just medical personnel. Most people do not have heart trouble at a hospital or fire station, they have it going about their everyday lives. And when someone has a heart attack outside of a hospital, their survival often depends on receiving help from a bystander. Signs of Heart Trouble First, how do you know when someone is experiencing cardiac arrest? The signs and symptoms of cardiac arrest are immediate and drastic, including: Sudden collapse No pulse Not breathing Loss of consciousness And sometimes, patients can experience symptoms beforehand, such as fatigue, fainting, blackouts, dizziness, chest pain, shortness of breath or vomiting. CPR Change Many of us know CPR as both mouth-to-mouth and pumps to the chest, but the rule now is hands-only. Can you explain the change? Hands-only CPR is exactly what the name says -- it's CPR without mouth-to-mouth. The American Heart Association recommends using only your hands. So if you see someone suddenly collapse, it’s recommended to call 9-1-1 and push hard and fast in the center of their chest. Doing this will get blood flowing back to the brain, lungs and other organs for someone having heart problems. Performing CPR on Adults vs. Children Hands-only CPR is just as effective as mouth-to-mouth and chest compressions for teens and adults who may have gone into cardiac arrest. Remember, it’s important to act fast. First, call 9-1-1 and then start chest compressions right away. If you perform CPR on someone within the first few minutes, it can double or triple their chance of survival. Keep in mind, for infants and children younger than 12 years old, regular CPR with mouth-to-mouth, as well as chest compressions, is still recommended. Two Steps to Save a Life If you see a teen or adult suddenly collapse follow these two steps: Call 911 so care providers can begin to respond. When calling 911, be specific about your location, especially if you are calling from a cell phone. Knowing the street address, building, floor and closest entry point can save precious time for first responders. Answering the dispatcher’s questions will make sure help arrives fast, and at the correct location. Push hard and fast in the center of the chest. The goal during CPR is 100 to 120 compressions per minute, about the same tempo as the song “Stayin’ Alive,” or “Thriller.” For hand placement, it’s also important to put the heel of your hand on the center of their chest and place the other hand on top. Push down on their chest at least two inches. It may seem severe at the time, but pushing this hard can truly save a life. Continue performing compressions as long as possible. If you tire, have someone take over compressions, if possible, and take turns until medical help arrives. For information on a CPR course in Reno, please contact REMSA at 775-858-5700.
Read More About Life-Saving CPR: Are Your Skills up to Date?
-
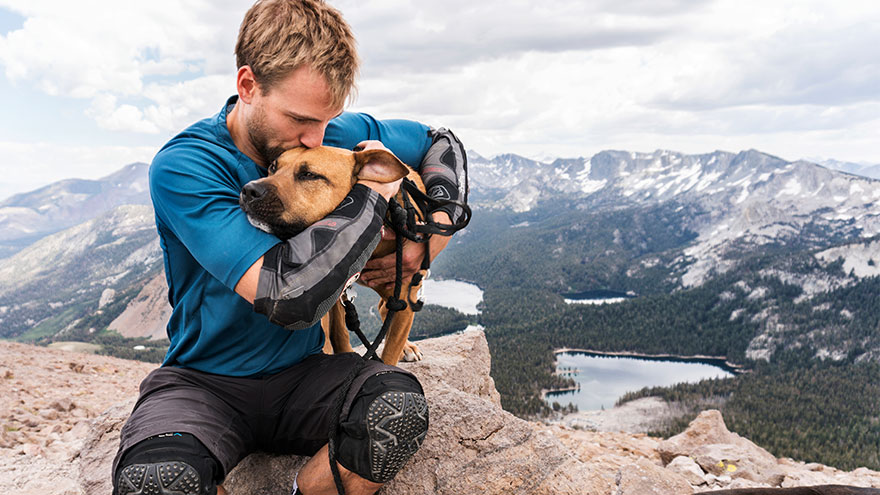
8 Local Hiking Trails You Need to Explore
Need fresh hiking trails? These hiking trails offer new views, a different route or the motivation you need to get outside. Of course, whatever you’re looking for this summer, these trails were made for sunshine in Reno-Tahoe. Easy Hiking Trails Oxbow Nature Study Area Nature Trail Location: 3100 Dickerson Road, at the Truckee River. Parking: There is a parking lot onsite. Time Out and Back: 30 minutes Items to Bring: Water, sunscreen and a hat. Although this loop is just under one mile, it’s the perfect escape in the heart of Reno. And this riverside trail is accessible for all skill levels. Bird watcher? Certainly, keep an eye out for black-crowned night herons, red-shouldered hawks, mule deer, beavers and more wildlife in the area. Tahoe-Pyramid Bikeway – Sections 2 to 4 Location: West Reno to Sparks Parking: Woodland Drive, Crissie Caughlin Park, Idlewild Park, 1st Street, Rock Park and Spice Island Drive. Time Out and Back: 2-4 hours (each section, out and back) Items to Bring: Water, sunscreen and a hat. From west Reno to Sparks, this paved portion of the trail stretches more than 8 miles. And it is easy to find as it runs along the Truckee River. As one of the easiest hiking trails in the region, it includes numerous parking access points and you can walk as long or short as you desire. In particular, one great route is from Rock Park on S. Rock Boulevard to Cottonwood Park on Spice Island Drive in Sparks. It’s an easy walk for all hiking levels. Notably many evening hikers explore this area to view the bats living under the McCarran Bridge. Additionally, an array of birds and river views can also be found along this enjoyable path. For maps for sections of this path, visit Tahoe-Pyramid Bikeway’s website. Cave Rock Hiking Trail Location: South Lake Tahoe; turn right on Cave Rock Drive from Highway 50, just prior to the tunnel. Parking: Park on Cave Rock Drive. Time Out and Back: 30 minutes Items to Bring: Water and sunscreen. Not only does this short trail have breathtaking views of Lake Tahoe, but it is also meaningful. Chiefly the rock was created more than three million years ago. Equally important, it is still considered sacred to the Washoe Native Americans. Also, leashed dogs are welcome on the trail. Moderate Hiking Trails Steamboat Ditch Trail Location: To get to the trailhead, take Mayberry Drive in west Reno. Then turn south on Plateau Road and right onto Woodchuck Circle. Parking: There is a dirt area for limited parking. Time Out and Back: 3-5 hours Items to Bring: Water, layers, sunscreen and a hat. Of all the hiking trails listed, this one offers some of the best views of downtown Reno and the surrounding hillsides. Built by Chinese laborers in the late 1870s, the Steamboat Ditch is the longest ditch in the Truckee Meadows region. In fact, the water serves as a vital source for ranchers and farmers south of Reno. First, start behind the Patagonia in northwest Reno at the Tom Cooke Trail or park off of Woodchuck Circle. Next head west to find the “Hole in the Wall.” Surprisingly this is a tunnel engineered through the hill, so the ditch could supply water to the Truckee Meadows. This hike is a little over 8 miles with the halfway point just under 4½ miles. With this in mind, if you’re thinking of hiking with your four-legged friend, remember to bring your leash because rattlesnakes can be spotted. Usually there’s also little shade, so plan accordingly by bringing a hat and dressing in layers. Thomas Creek Trail Location: Head out on Mt. Rose Highway going west to Timberline Road. Then drive 1.3 miles past the end of the pavement, stay on Timberline and you will see the trail head on your left shortly after you cross the bridge. Parking: There is a paved parking area on Timberline Drive. Time Out to Back: 2-6 hours Items to Bring: Water, layers, food and a phone with GPS or map. Definitely put he Thomas Creek Trail on your hiking trails list. Located off of Mt. Rose Highway, it is a very scenic hike winding along Thomas Creek into a Jeffrey pine forest. You may choose to hike to what appears to be the end of the trail (where it meets the road) or continue further up for 1/8 of a mile into the Mt. Rose Wilderness. Hiking up the trail to the creek crossing, and then taking the dirt road back down is a great way to see the entire canyon. While this hiking trail is closer to 5 miles, it can be shortened by turning around at any point. Another option is to look for signs to turn off the Thomas Creek Trail at the junction for Dry Pond Loop. Dry Pond is a 4½-mile, out and back hiking trail from the Timberline parking lot. Ultimately you may see a pond or hilltop meadow, depending on the season and weather. Overall it is possible to go anywhere from 2 to 6 miles (or more), based on what you choose to hike. The gain along the creek is minimal, with an 800-foot gain at the top part of the trail. In particular, watch for mountain bikers, as this is also a very popular biking trail. Hunter Creek Trail Location: Go west on Mayberry Drive to Plateau Road. Then turn left and go up the hill to Woodchuck Drive. Lastly, turn right and follow Woodchuck to the hiking trail head. Parking: Paved parking on Woodchuck Drive with a bathroom and benches. Time Out and Back: 2-5 hours Items to Bring: Water, layers, a snack, sturdy shoes and sunscreen. The Hunter Creek trail is about a 7-mile day hike with a little over 1,000 feet of overall gain leading to a waterfall. Ultimately it’s totally worth the trip! This hiking trail winds up Hunter Canyon through sagebrush, Jeffrey pines and interesting rock formations. The waterfall is a great place to sit on shaded logs and enjoy lunch. This trek is very rocky and narrow at times, so good trail shoes are recommended. Furry friends should also be leashed, as rattlesnakes and wildlife are common along the trail. Difficult Hiking Trails Hidden Valley Loop Location: Hidden Valley Regional Park; drive east on Pembroke Drive and turn left on Parkway Drive. The park is at the end of the road. Parking: Park on the east side of the park, closest to the hills. Time Out and Back: 3-6 hours Items to Bring: Water, sunscreen, shoes with good traction and a lunch or snack. Overall this 6-mile loop has about 1,800 feet of gain and is located east of Hidden Valley. We recommend starting the hike from Hidden Valley Regional Park. First, head southeast on a dirt road and then turn east onto a very steep trail that winds over red dirt for about a half mile. In fact, this is the steepest part and it’s a leg burner. Once you get past the climb, the trail gradient decreases. Then you wind along the south side of a big bowl lined with pinyon pine and juniper trees. The hiking trail continues up to the ridge line where there are incredible views of the Truckee Meadows and Mt. Rose. You can hike back down from this point, but it is best to continue on the trail along the ridge line to where it isn’t as steep with incredible views. Frequently you may see wild horses while hiking in this area. Mount Tallac Location: Southwestern side of Lake Tahoe, between Emerald Bay and Camp Richardson. Turn south on Mt. Tallac Road from Highway 89. Parking: Follow Mt. Tallac Road to the parking lot. Time Out and Back: 6 hours Items to Bring: Water, layers, lunch or snacks, sunglasses, hat, sturdy shoes and sunscreen. Definitely a big hike with an even bigger reward — an incredible view of the Desolation Wilderness and Lake Tahoe. This hiking trail is 10.5 miles out and back with a 3,500-foot elevation gain. If you’d like to explore the area without the 6-hour commitment, hike 1.7 miles out to Floating Island Lake or 2.3 miles out to Cathedral Lake. Day use permits are required and you can fill one out for free at the trailhead.